
materials list – same for both playshops
Please also see the note at the bottom of this page on how to test your markers before the playshops. To get the most out of these playshops, particularly the Water Art one, it’s important that your marker colors run and blend a bit when water is put on them.
Please bring to the playshop:
- A pencil and eraser
- Scissors – for the Water Art playshop only, in case you want to make a large piece of paper smaller
- Markers
(Crayola works best in Jen’s experience; either Crayola’s washable or regular markers are fine) - Heavier paper
(Jen will be using a piece 5.5″ x 8.5″ for the Mouse playshop, and a mix of 5.5″ x 8.5″ and 9″ x 12″ pieces for the Water Art one, but any size can work) - A small to medium sized brush or two
- A container with water in it
(You may want to have several containers of water so you don’t need to change the water out so often) - A pigment marker (0.5 mm tip is best) – although pigment markers work best, a black, fine point marker like a Sharpie can also work (something with water resistant/permanent ink). Pigment markers can be found on Amazon and in art supply stores.
- Paper towels or rag – they will catch the water we’ll be dripping off the page (Water Art playshop), and be used to blot up excess water on the paper
- A few pieces of the heavier paper to use as scrap paper (to test marker colors and play around with the technique before using it on your actual pieces of art)
- Blow dryer (optional, for speeding up drying time)

How to test your markers
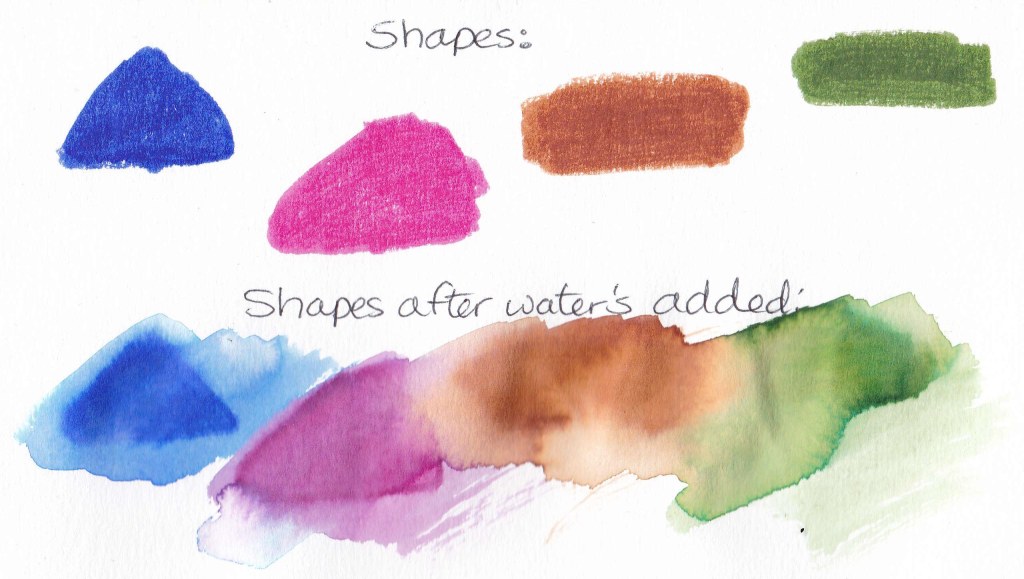
Although not as critical for the Mouse in the Rain playshop, the Water Art playshop requires markers that react well to water. You want the colors to run and blend when water is added to them.
An example of this is the image above. The colors have blended into each other and there are marks left by the water when it ran over the page.
Marker test
What you’ll need:
- A piece of the heavier paper you’ll be using at the playshop
- A container of water
- A small to medium sized paintbrush
- 3-5 of your markers in different colors
Steps:
- Draw a shape with each marker on the paper and color it in so it’s solid. The shapes don’t have to be large, even 2-3 inches across will be fine. You just want to create some solid areas of ink to test with the water, as in the example below.
- Dip your paintbrush in the water and “paint” over each shape, one by one, with the water. If you need to, dip your brush in the water in between shapes.
- The water should pick up some of the marker ink and become slightly colored, and the ink should spread on the page. There may be differences between individual marker colors, however overall the ink should be spreading on the page.
The example below illustrates what to look for. If your ink doesn’t run quite as much as this, it’s okay as long as it is visibly running and spreading on the paper.
Troubleshooting, if Your markers aren’t working well:
If your markers are reacting very little, or not at all, to the water you may want to try:
- Getting some new markers (sometimes older markers are starting to dry out, enough that the ink doesn’t run and blend so well).
- Changing the brand of markers – in Jen’s experience Crayola tends to work the most consistently.
- A different kind of paper. Mixed media art paper works the best. Good quality sketch paper can work well, as a second choice.
Paper that doesn’t work well: Proper watercolor paper, the really heavy and rough kind that you can buy in art stores. And lighter, thinner papers (even some sketch papers). In both cases they absorb too much of the water and ink, so it doesn’t run properly.
There may be other variables affecting the outcome. For example, we have no idea if using hard or soft water makes a difference. But these are the tips we’ve come up with so far. We hope they’re helpful and we look forward to seeing you at the playshop!
